

 Spanish
  French
  German
  Simplified Chinese
 General settings
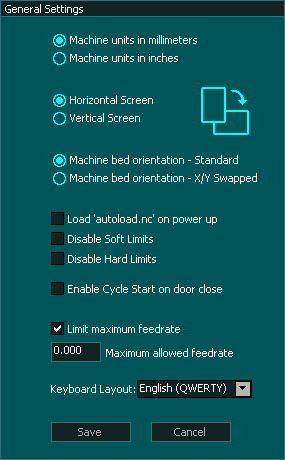
Machine units
- If you prefer your machine to operate using metric measurements, select

- If you prefer your machine to operate using inch measurements, select

Horizontal / Vertical Screen

- This rotates the screen 90 degrees so that the monitor can be used in either Horizontal or Vertical mode.
- The Default mode for MASSO Touch is Vertical mode
- Vertical mode is designed to be used with a touch screen and includes a keyboard in the lower part of the screen
- The Default mode for MASSO G3 is Horizontal mode
- Horizontal mode is designed for a screen without touch screen.
- For additional information on the different Graphical layouts please see this page Graphical interface
- MASSO Touch can be used in either mode but since horizontal mode does not include a keyboard an external keyboard must be used.
- Touch screen functionality is available in both screen modes.
- This setting does not take effect until MASSO is repowered.
INFORMATION: If you have set your MASSO Touch into Horizontal mode for a look or by mistake and want to change back, you can plug in an external Keyboard into the external USB port on MASSO Touch and enter your Admin Password. After this you can set it back to Vertical mode and restart MASSO.
Machine Bed orientation

- The machine bed orientation setting in the F1 General Settings screen allow the user to swap the X & Y axis display on the MASSO screen.
- This is for people who choose to set their machine up with the Y axis moving left and right and the X axis moving backwards and forwards.
- It is a non standard set up and should be avoided if possible but for those who wish to set their machine like this, selecting the Machine Bed Orientation to swapped will rotate what you see on the screen to march what you see on the table.
- Please note that this does not swap the physical X & Y axis on the machine and cannot be used to rotate a toolpath.
Autoload on Power Up

- If this option is ticked MASSO will look for a file called autoload.nc on the root directory of your flash drive when MASSO is powered up or the flash drive is inserted and if it locates this file it will automatically load it ready to run.
Disable Softlimits

- Putting a tick in this box will disable soft limits while machining.
- Please note that soft limits are still active while jogging even when disabled.
- For additional information on soft limts please see this page Soft Limts
Disable Hard Limits

- Putting a tick in this box will disable hard limits.
- The Homing sensors on MASSO act as machine limits after homing is complete.
- If this box is unticked after homing a triggered homing sensor will cause a Hard Limit alarm
- If this box is ticked after homing a triggered homing sensor is ignored.
- Hard limits trigger when a homing sensor changed to High
- For additional information on hard limts please see this page Hard Limts
Enable Cycle Start on Door Close

- This setting determines how opening the machine door behaves when the door is closed.
- If this box is unticked, after closing the door the Cycle Start button must be pressed to continue machining
- If this box is ticked, after closing the door the machine will automatically resume machining.
- For more information on the Door input please see this page Door Input
Limit Maximum Feedrate

- This setting allows the user to set a maximum feed rate while machining.
- No axis is allowed to exceed the maximum allowed feed rate specified.
- You will not see the Maximum allowed feedrate box is not visible until the Limit maximum feedrate box is ticked.

- The biggest use of this feature is running third party provided Gcode which is too fast for your machine.
- WARNING: Do not set the feed rate to 0 when using this feature as this will stop G1,G2 & G3 moves.
Keyboard Layout

- Users may choose between QWERTY and QWERTZ keyboard layouts by selecting from the pull down menu
- Default is the standard English keyboard.