

 Spanish
  French
  German
  Simplified Chinese
 Homing
Homing is an important part of using your MASSO and there are several types of homing available.
It is important to understand that the homing sensor at the end of the homing process changes to become the Hard limit sensor which allows the same sensor to home the machine as well as monitor when the machine moves outside of it's limits.
For additional information on how to start the homing process please see: How to home your machine
Mounting the Homing sensor
Traditionally Homing sensors and limit switches are placed at the extreme ends of the Axis travel and are wired back to the controller.
This is wasteful of system resources, hardware and wiring.
Homing sensors work very well when only homing and soft limits are used.
When using your Homing sensor as both homing sensor and Hard Limit sensor it is recommenced that you mount the Homing sensor on the moving axis carriage and place a trigger for the sensor at each end of the Axis travel. The allows the one sensor to be triggered at each end of it's travel with minimal hardware and wiring required. see the example below.
Note: the trigger for the sensor must be such that the sensor remains High throughout the homing process.

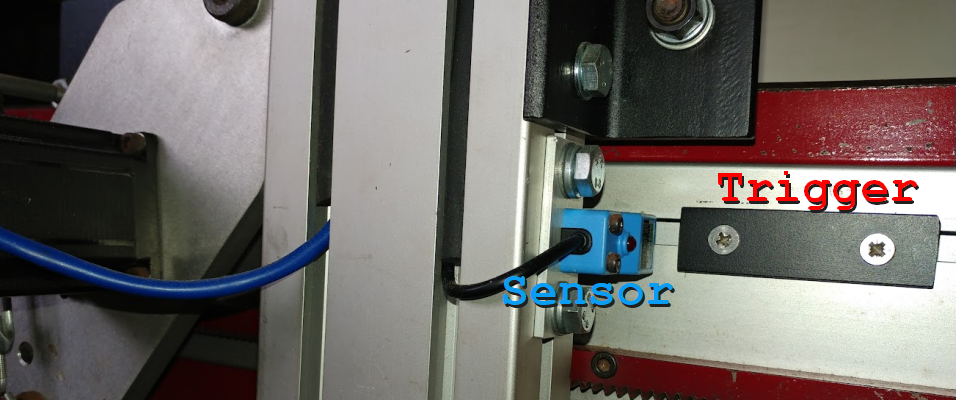
Example axis with the sensor mounted on the moving carriage and the trigger mounted on the stationary rail
If converting an existing machine with Homing and limit sensors at each end of the axis these will need to be multiplexed and connected to the axis homing input on MASSO.
How this is done will depend on the sensor or switch being used. In this case both sensors or switches will need to be connected to the required axis homing input in such a way that the trigger of either senor or switch at either end of the axis will change the homing input from Low to High.
Auto Homing
This is the recommended method of homing your machine.
For Auto homing to work a sensor is required for each axis that will be homed.
On a 3 axis mill that would be the X, Y & Z axis and will require 3 homing sensors.
If you have a hardware slaved axis such as 2 motors connected to your Y axis then only one homing sensor is required for the Y axis as both motors are driven from the same Y axis signal.
Auto Homing with Axis Squaring
If you are software slaving then this includes the Auto squaring feature.
It uses the position of the homing switches on the dual motor axis to automatically square the machine as it homes.
It does this by having individual motors on the dual axis connected to different axis such as the Y & B axis.
Each axis will have it's own sensor and will home to its own sensor.
When the first motor triggers it's sensor it will stop and wait for the 2nd motor to locate its sensor and stop.
Both motors will back off their sensors. and at the end of the homing process will Lock together to form a single axis.
The position of each sensor will determine the squareness of the axis.
Squaring of the Axis is best achieved by moving the sensor on one side of the axis with respect the the sensor on the other side of the axis.
It is not recommended to use the pull off distance to adjust squaring as this will force the axis out of square and then back into square each time the machine is homed. This can lead to damage to the axis over time as tit will constantly twist the axis.
If you do not have one sensor per motor on a Software slaved axis you will get a Homing Alarm.
For more information on the types of Axis slaving please see the following page
The Homing process
Regardless of which Auto homing process you use the Homing sequence is the same.
Homing is started by Double clicking or double tapping the Homing indication on screen using CTRL+ALT + H on an external keyboard or pressing an external Home Machine Button.
It consists of 4 distinct phases
- Seeking the homing sensor
- Back off which locates the primary home location
- Pull off
- Set Home Position
Example Homing sequence
- The axis moves towards its axis homing sensor until MASSO sees the axis Homing sensor changes to High
- If the homing sensor is already High MASSO will assume that the sensor is already found and will move to next step in the homing process.
- When the Sensor changes to High the axis decelerates and stops.
- The distance the axis travels after it starts to decelerate is determined by the axis acceleration setting.
- During the deceleration and stop the sensor must remain High at all times.
- The axis backs slowly off the sensor until the sensor changes to Low.
- The axis stops and the Back off process is complete with the primary home position located.
- If a Pull off distance is specified the axis will move at rapid speed the specified distance from the primary home location and stop.
- The current position is now assigned the coordinate shown in the Home position.
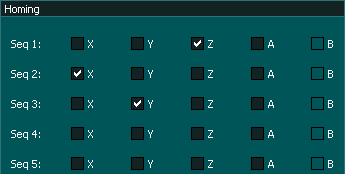
Homing Sequence
This defines the order in which the axis will home.
- You can do them one at a time or do them all together
- Axis that are software slaved are automatically grayed out and cannot be selected.

- If a slave axis shows a tick it is because it was ticked previous to being slaved and will work the same as an unticked one.

- A slaved axis with work correctly whether the slaved axis shows as ticked or unticked as it is controlled by the master axis.
- Any axis that is not selected will automatically be set to the Home position value at the end of the homing process.
Direction invert
This setting changes the direction that the axis uses when seeking the Homing sensor.
INFORMATION: Before setting this direction make sure you have set the axis to move in the correct direction for machining

Homing Feedrate
This setting determines how fast the axis will move when seeking for the Homing sensor.

Your maximum homing feed rate is ultimately determined by your motor acceleration.
The lower your acceleration the longer it will take to decelerate the axis once the homing sensor is triggered.
Your axis must stop within 10mm or 0.3937" of this trigger point or MASSO will not be able to back off before giving an alarm.
Slow axis acceleration means slow deceleration and longer travel before coming to a halt with the result being that motors with higher accelerations can have higher a Homing Feed Rates.
Back off
The purpose of Back off is to accurately locate the point at which the homing sensor returns to Low.
This accurately fixes what is called the primary home location on the machine.
This may or may not be the final home position.
Rules
- The trigger for the homing sensor must remain High until the axis backs off the sensor. ie it must not trigger and return to Low before the axis comes to a halt.
- Ensure your sensor remains high for a minimum of 10mm once triggered.
- If the homing sensor does not return to Low within 10mm or 0.3937" a homing alarm will be given.
- If the homing sensor changed to Low during the deceleration phase it will not back off the sensor.
Pull Off Distance

Home Position Setting

Manual Homing / Stall Homing
This involves moving to a specific, repeatable location on the machine that you want to call your home position.
- This can be done by manually moving the X, Y & Z axis to the designated position and double clicking the Home button.
- This includes stall homing which involves jogging the axis until they stall against physical barriers to act as a repeatable position then double click the Home button to set this as the home position.
- This method requires no homing sensors.
- To use this method all axis must be left unticked in the Homing sequence
- Each axis will be assigned the coordinate of the Home Position

Setting up homing Step by Step
TroubleShooting
If you get Homing alarms when homing there can be several causes which you should investigate.
- Ensure all homing sensors show Low in the F1 screen when the sensor is not triggered
- Ensure that the homing sensors change to High when triggered by the axis.
- If when you home the Axis moves slowly backwards 10mm and alarms instead of moving towards the homing sensor then your homing sensor is either set High in on the F1 page or the sensor is faulty.
- If you get a homing alarm when the axis is backing off a sensor the most likely cause is the deceleration of the axis took it beyond 10mm. Reducing the Homing Feedrate will fix this problem.
- If you get a hard limit alarm during homing an axis it is most likely that you triggered the homing sensor and then moved past it to the other side and the sensor went low again. In this case the axis will not back off the sensor because it is already low and when it tries to pull off the sensor it will trigger a hard limit alarm. The sensor must remain high until the axis backs off the homing sensor. Ensure your sensor remains high for a minimum of 10mm once triggered. Reducing homing speed or increasing axis acceleration can also help if this is not possible.
- If after homing the machine sits and Flashes homing but does nothing the most likely cause is Auto Tool Zero is turned on but you have not set it up correctly. If disabling Auto Tool Zero fixes the homing error but you have a tool setter installed please check your tool setter settings as this is where the problem lies.
- If after homing the machine sits and flashes Homing but does nothing you may have a tool changer enabled on your machine but have not set it up correctly. Some tool changer types home during the homing sequence. Change the tool changer to manual until you have completed the install of your Tool Changer.
- If after homing the machine sits and flashes Homing another cause can be that you have a Soft limit issue. This can be that the tool setter is outside the soft limits or you have set the soft limits for the Z axis preventing it moving Z axis to machine coordinate Z0. The Z axis will rise to Z0 before moving the the tool setter and if your soft limits prevent the then the machine with stop and eventually time out. Ensure that all axis soft limits allow movement to the tool setter location and the Z axis is allowed to move up to Z0 and down far enough to touch off the tool on the tool setter.
- If unsure how your Homing sensor should be wired please see our Quick Start guide on Homing sensor Identification.
- On a software slave axis it is very important that the right sensor is assigned to the right motor or you will get very strange results when homing the slaved axis. Use the technique shown in the Homing video above to identify which motor of a slaved axis is which and which sensor is which. Do not Assume..